This article focuses on the very basics of mIRC. The articles target audience are people with no knowledge or very limited knowledge of the mIRC scripting language.
Contents
Where does the code go?
All your code, regardless of its type should go in the Script Editor. To open the script editor type: <Alt>+R. Alternatively, you can go to the Tools Menu -> Script editor.
All Events go in the "Remote" tab of the script editor. Popups go in the "Popups" tab of the script editor. Aliases are special. An alias may go in "Remote" tab if and only if the code is prefixed with the "alias" keyword. Otherwise it must go in the "Aliases" tab.
The very basics
Before we can do anything productive, we must understand some of the most basic parts of a script.
Statements
Every script is composed of one or more statements. Each statement must go on its own line or separated by a pipe. For example, the following two are the same:
statement 1 | statement 2 | statement 3 | statement 4
and:
statement 1
statement 2
statement 3
statement 4
What's with the slashes?
If you asked any script related question in a help channel, you were probably told to type some code that begin with a forward slash. In order to execute any code from the mIRC editbox (the chat box where you normally talk), you must prefix the code with two forward slashes (in some cases only a single slash, we will talk about these cases later).
/echo command
A statement describes something that needs to happen. The most common type of statements are commands. Commands are a way to tell mIRC to perform a basic operation. By far the most common command you will be using is the /echo command. The /echo command simply prints text to the screen. Every echo command prints on a line of its own.
Let's go to an example. Type the following code from your editbox:
//echo Hello World!
You should see the following result:
Hello World!
Recall we said earlier that multiple statements can be combined by using the pipe (|)? Let's print 3 lines. Run the following code from your editbox:
//echo Scripting | echo Is | echo Fun!
You should hopefully see the following results:
Scripting
Is
Fun!
Let's make it into an alias, shall we?
At the beginning of this tutorial we talked about aliases. We said it's used to describe any script that can be reused. An alias has a name by which we can refer to it and it has a body. The body contains a statement or a list of statements that execute when we call that alias. A basic alias will look like this:
alias name <statement>
We can tweak that syntax just a little to perform multiple statements using the pipe symbol:
alias name statement 1 | statement 2 | statement 3
Let's make the code we used above to print "Scripting Is Fun!" to make an alias called "fun"
alias fun echo Scripting | echo Is | echo Fun!
A few things I should note about the code above before we continue. The first is the fact that the two // where removed; we only really need it when we want to execute code directly from the editbox. Using slash in your script editor adds nothing but clutter. Secondly, because we used the alias keyword, the code must go in the Remote Tab of the script editor. In order to use that code from the aliases tab, you must remove the "alias" keyword. The rest of the code stays the same.
Remote tab
Aliases tab
Note: When you want to execute an alias you would say you want to "call the alias".
To call our alias "fun", all we have to do is use its name:
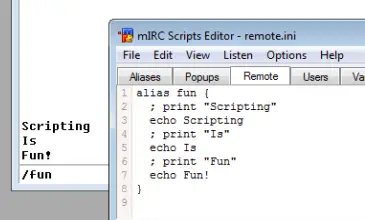
/fun
That should print our text again:
Scripting
Is
Fun!
A block of code:
When we have a group of related commands, we call it a block of code. Most scripts, however, are not as short as our example and putting it all on one long line is messy. We can use the second format we talked about which is storing each statement on a new line. In order to do that, we have to tell mIRC "this block of code belongs to this alias". We do that by enclosing the block of code in a pair of brackets:
alias name {
  statement 1
  statement 2
  statement 3
}
A few notes about the language limitations:
- The opening bracket ("{") must be on the same line as the alias keyword.
- The opening bracket must not touch anything.
- The closing bracket must not touch anything else.
- The closing bracket must be the last part of the block of code.
Wrong examples
alias example{echo hello! }
The opening bracket is touching the "example" and "echo".
alias example { echo hello!}
The closing bracket is touching the "hello!".
alias example
{
  echo hello!
}
The opening bracket must be on the same line as the "alias" keyword.
Using a block of code
Let's use the fun alias from before but put each statement on its own line:
alias fun {
  echo Scripting
  echo Is
  echo Fun!
}
Comments
Comments are normal, readable, text that can be placed inside the script to explain other scripters what's going on in your code (Technically a comment can say whatever you want). Comments are ignored when the program is executed and have no effect on the actual code. The most basic comment is the single-line comment which has the following syntax:
; This is single-line comment.
The comment starts with the semicolon and ends at the end of the line. Anything in between, including the semicolon, are ignored. For example:
alias fun {
  ; print "Scripting"
  echo Scripting
  ; print "Is"
  echo Is
  ; print "Fun"
  echo Fun!
}
The second type of comment is the multi-line comment. A multi-line comment can, as its name suggests, span multiple lines. The syntax for a multi-line comment is:
/* This is
  a multi-line
  comment!
*/
Your text must go between the /* and the */.
A few notes about the language limitations:
- Text may touch the /*
- The */ must be on a line of its own.
Wrong Examples:
/* testing
  test */
The */ is not on a line of Its own.
/* comment */
The */ is not on a line of Its own.
Identifiers
- Main article: aliases - mIRC
Before we wrap up this tutorial we need to talk about one last concept: $identifiers. All identifiers have a dollar symbol sigil and have the following syntax
$name
;or
$name(<argument 1>, <argument 2>, <argument 3>, ...)
Identifiers are very similar to commands except that we use identifiers when we want some value. For example, if we want to print out name, we would use the following code:
//echo -a $me
$rand()
One of the most common operations we use is to generate random numbers. This is where the $rand() identifier comes into play; it can generate a random number between a given range. The $rand() has the following syntax:
$rand(<low>, <high>)
Given a low bound and a high bound, $rand will return a number in between the two (including the two end points). For example:
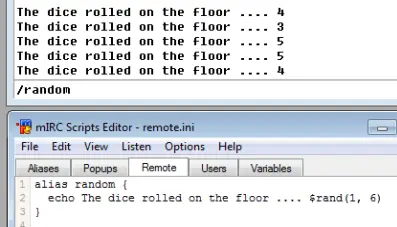
alias random {
  echo The dice rolled on the floor .... $rand(1, 6)
}
Here is what we got when we called out /random alias a few times:
Where do we go from here?
By now you should be starting to get the hang of it or at least beginning to understand how things work. It is highly recommended that you mess around with your code to see what happens when you change different things. From here you can read more about aliases or move on to variables.
Try on your own:
Below are a few very basic commands you can use experiment with in a safe manner. Go ahead, try them!
Colors:
Just like you can add colors when you talk by typing Cltr+<color>, you can do the same in your commands. Here is a simple example:
alias example {
  echo -a �3This �4is �6a �10cool �15example�1.
}
You may have notice we added a strange new thing, -a. The -a is called a switch. It slightly alters the way a command behaves. In the /echo command case, the -a switch tell it to echo to the current window we are at. There is another switch, the -s switch, which can be used to tell echo to print to the status window instead, regardless of which window you have open.
Will produce:
This is a cool example.
//echo -a The number �42� is even.
Will produce the following result:
The number is even.
Notice that the number is not showing. That's because it was considered part of the color number '42'. Prefixing the color value with a zero will fix this issue:
//echo -a The number �042� is even.
Will produce the following result:
The number 2 is even.
Actions
Actions are very similar to your normal channel messages except they are displayed in a slightly different manner.
; This is good for the channel you are in right now:
me <message>
; This is good for any channel you specify (as long as you are in that channel)
describe <#channe> <message>
For example:
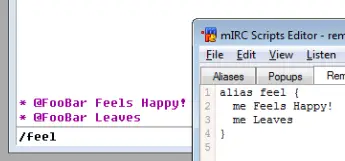
alias feel {
  me Feels Happy!
  me Leaves
}
The code should produce something like this: (Your name will obviously be different)
* @FooBar Feels Happy!
* @FooBar Leaves
If we wanted to specify a channel, we could have used:
alias feel {
  describe #MyChannel Feels Happy!
  describe #MyChannel Leaves
}


