| Line 40: | Line 40: | ||
== Volume Options == | == Volume Options == | ||
You can control the volume of your system (and therefore of the music played in mIRC) with the /vol command. | You can control the volume of your system (and therefore of the music played in mIRC) with the /vol command. | ||
| − | == Synopsis == | + | === Synopsis === |
<source lang="mIRC">/vol -wmpvuN [volume]]</source> | <source lang="mIRC">/vol -wmpvuN [volume]]</source> | ||
| − | === Flags === | + | ==== Flags ==== |
* -w - Changes the volume for WAVES | * -w - Changes the volume for WAVES | ||
* -m - Changes the volume for MIDI | * -m - Changes the volume for MIDI | ||
Revision as of 00:41, 30 December 2013
| This article is still a stub and needs your attention. You can help improve this article by editing this page and adding the missing information. |
Playing music in mIRC is really a very simple process, easily accomplished through the use of the /splay command. mIRC can also be enhanced by other sounds, not just songs, as well. Depending on how you want your own, custom mIRC experience to be, whether you are a newbie or an advanced scripter, sounds are often added to events in mIRC by some scripters. Creating games in mIRC is an advanced type of script where sounds can greatly enhance a user's experience.
Contents
Enabling mIRC Sounds
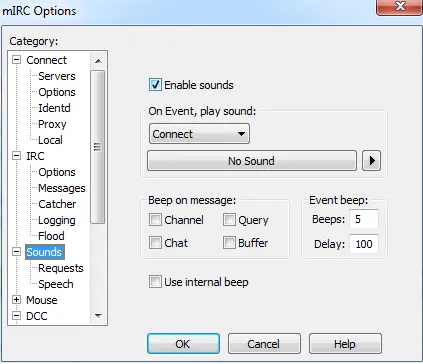
In order for you to be able to play music or any other type of sound in mIRC, you must first enable sounds. Sounds can be enabled simply by going to the options dialog (Alt+O), then clicking on the 'Sounds' option in the left-hand side list, and then placing a check mark into the Enable Sounds. Below is a screenshot of the options window with the Enable Sounds option ticked.
Note: you can also use the command /ebeeps to enable sound in mIRC: /ebeeps on
Support
mIRC supports the following media formats: .wma,.mp3,.wav,.mid,.ogg
Note: the .mp3, .wma and .ogg format are considered the same format when using /splay
Multiple file formats can be played at the same time, but you cannot play multiple files, of the same format, at the same time. For instance, you can play a .wav file at the same time as an .mp3 file, but you cannot play a .wav file and another .wav file at the same time. The second .wav file will take precedence if you're not queuing the file: the first .wav file will be stopped and the second one then played.
Synopsis
/splay -cwmpq [filename | stop | pause | resume | seek | skip] [pos]
Flags
- -wmp - Indicates that the function (only Stop or Skip can be used with those) will be done on the specified format that are playing where -w indicated a WAVE format, -m a MIDI format and -p a MP3/OGG/WMA format. You can specify more than one switch at the same time for Stop but not for Skip.
- -q - Adds the file to a queue for that format, first file in the queue for that format is played when a song of that format ends its playback.
- [filename] - The file name for the mIRC file.
- [stop|pause|resume|seek|skip] - Allows further control over existing playing file; their titles are their respective functions. These are discussed, in more detail, further down.
- [pos] - This optional parameter is used to point out the location in the music file, in milliseconds, for your sound to either start from or seek.
Music Playing, Now What?
After the music is playing, you have a few options available for manipulating the playback. If you are making a full Music Player, for example in a dialog form, these options are really helpful.
Playback Options
- Pause -
/splay pauseis used to pause the playing music - Resume -
/splay resumeallows you to resume the paused music file. - Stop -
/splay stopwill stop the current music file. - Seek -
/splay seek [pos]will go to a certain point in the music. Example:/splay seek 1000 - Skip -
/splay skipallows you to skip the currently playing music file.
Volume Options
You can control the volume of your system (and therefore of the music played in mIRC) with the /vol command.
Synopsis
/vol -wmpvuN [volume]]
Flags
- -w - Changes the volume for WAVES
- -m - Changes the volume for MIDI
- -p - Changes the volume for MP3/WMA/OGG.
- -uN - Sets the mute setting, N = 1 for on, N = 2 for off
- [volume] - A number indicating the volume, range from 0 (no sound) to 65535 (max).
Examples
;Play the mp3 file, if an mp3 file is already playing, it is stopped before.
/splay C:\Directory_To_Music_File\MusicFile.mp3

;Play a mp3 file at a specific point (1500 milliseconds from the beginning)
/splay C:\My Music\file.mp3 1500

;Stop the wave file that is currently playing, if any
/splay -w stop

;Stop the wave file and the mp3/wma/ogg file that are currently playing, if any
/splay -wp stop

;Seek the mp3 file that is playing, won't work on MIDI or WAVE so -p is not required
/splay seek 1000

;Skip the song currently playing for the wave format
/splay -w skip 1000
