(→Instruct mIRC to use the new folders) |
(→Instruct mIRC to use the new folders) |
||
| Line 13: | Line 13: | ||
== Instruct mIRC to use the new folders == | == Instruct mIRC to use the new folders == | ||
Right click on the new shortcut link and go to '''Properties'''. In the '''Shortcut''' tab, replace the text next to '''Target''' with the following: | Right click on the new shortcut link and go to '''Properties'''. In the '''Shortcut''' tab, replace the text next to '''Target''' with the following: | ||
| − | < | + | <pre>"<your\mIRC\exe\path>" -r "<new\folder\path>"</pre> |
This change in paths must reflect the real paths of the end-user. An example of these paths would resemble the following example: | This change in paths must reflect the real paths of the end-user. An example of these paths would resemble the following example: | ||
| − | < | + | <pre>"C:\Program Files (x86)\mIRC\mirc.exe" -r "C:\Users\David\AppData\Roaming\mIRC\bot"</pre> |
| − | |||
| − | |||
Clicking '''OK''' is the final step, and the new Virtual Profile is ready to go. The next time that mIRC is launched using this link, it will open the settings for the new profile. | Clicking '''OK''' is the final step, and the new Virtual Profile is ready to go. The next time that mIRC is launched using this link, it will open the settings for the new profile. | ||
Revision as of 22:38, 30 June 2014
Contents
Steps For Creating A Virtual Profile
mIRC does not have a built-in way to handle multiple users with different scripts and settings. This article will guide users toward easily creating multiple Virtual Profiles using a single installation of mIRC. Each of these virtual profiles will have the ability to run their own set of scripts and have their own set of options.
Create a shortcut for each profile
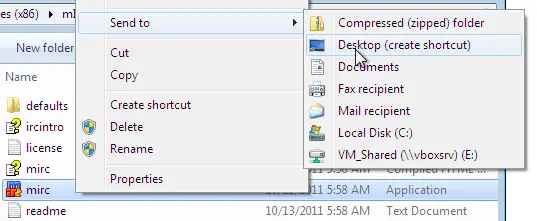
The first thing you must do is create a shortcut for each individual profile. It is recommended that you name each shortcut something appropriate so you will know which shortcut is for which profile. To create a shortcut, navigate to the mIRC executable folder using the command below. Right click on the mIRC.exe, go to Send to and click Desktop. The standard folder of mIRC.exe is "C:\Program Files (x86)\mIRC" or "C:\Program Files\mIRC".
//run $nofile($mircexe)
Create a script folder for each profile
Creating a new folder is necessary for each of the separate profiles. The location of that folder is not very important. For example, a good place would be in the My Documents folder. The folder will be used to keep the individual mIRC settings as well as all the related scripts.
Instruct mIRC to use the new folders
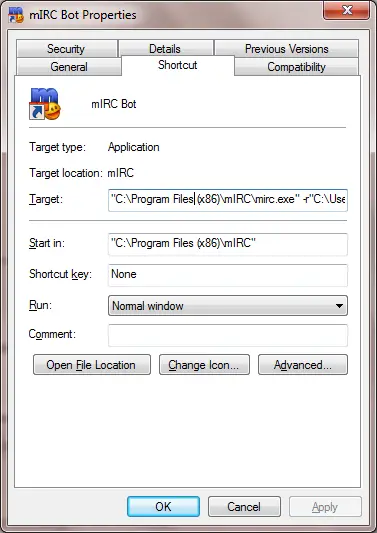
Right click on the new shortcut link and go to Properties. In the Shortcut tab, replace the text next to Target with the following:
"<your\mIRC\exe\path>" -r "<new\folder\path>"
This change in paths must reflect the real paths of the end-user. An example of these paths would resemble the following example:
"C:\Program Files (x86)\mIRC\mirc.exe" -r "C:\Users\David\AppData\Roaming\mIRC\bot"
Clicking OK is the final step, and the new Virtual Profile is ready to go. The next time that mIRC is launched using this link, it will open the settings for the new profile.
Other settings
There are a number of other settings that can be used to manipulate mIRC as well. The following sections outline just a few of them.
Connect to a server on startup:
A connection can be made to a server, immediately upon mIRC starting, using the following syntax:
-s<server:port> [-j#chan1,#chan2,#chan3]
For example:
-sirc.undernet.org:6667 -j#mircscripting
Change mIRC.ini location ($mircini)
Another option is to change the location of the mIRC.ini (the main mIRC configuration file):
-i<path\to\mirc.ini>
Switches can be combined as needed.

